
1. INTRODUCTION
In the process of modern industrial measurement, the integration of measurement and control is the most effective means to realize industrial automation. In this respect, measuring and testing technology will play a more important role and get greater development. In the control system, more and more people using PLC as the controller, which is more convenient, especially in the aspect of position, speed and torque.
The Panasonic PLC, with its perfect function, small size and low price, are increasingly applicated in the modern industry control system. But it also has the disadvantages of poor data management ability, can’t provide humanized interface etc. Therefore, we need to make up for these shortcomings and give full play to its performance with the help of communication between PLC and PC. Communication between PC and PLC is realized in two ways, which are configuration software and high level language.
Though configuration software is convenient, we need to pay the high cost of software, and secondary development is limited. In the software development industry today, combined the visual operation of VB with the efficiency of C++, C# becomes the preferred language of .NET development with powerful operation ability and innovative language features. In many measurement and control system, we need to combine other procedures developed for C# with PLC control, to make the system not only can collect and store data in time, but also for advanced data processing, to achieve the integration of measure, control and management and better complete the operation. Therefore, it’s very important to realize the communication of Panasonic PLC and PC in the C#.NET environment.
2. PANASONIC PLC COMMUNICATION PROTOCOL
2.1 Communication process
Panasonic PLC communicates with PC through RS232. Data transmits in the form of ASCII[3]. First, the computer sends
command, PLC responds appropriately to the command. Then computer receives the respond. Its communication sent format is like this.
2.2 Communication sent format
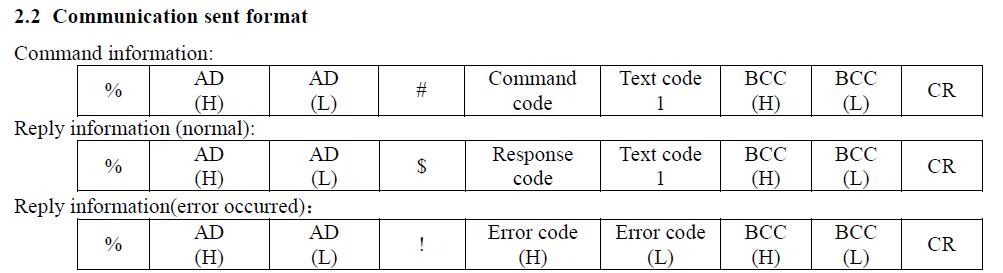
2.3 Communication sent format specification
Among them,”%” is the starting symbol, marking the beginning of each frame message. ”CR” is the ending symbol,
marking the end of each frame message. ”AD” is each PLC station address, represented by two hexadecimal numbers.
Such as “01” represents the first PLC. ”#”,”$”,”!” marking the type of the frame message, for which the corresponding
as follows: command information, response information (normal), response information (error). ”BCC” is check code,
represented by two hexadecimal numbers. Its initial value is “0”.Then bitwise exclusive OR from the initial bit to the
frame message in each byte.
3. THE REALIZATION OF THE COMMUNICATION PROGRAMMING
In the past, the software of communication with industrial PLC in Windows environment is MSCOMM control in VB6.0,
but in .NET has been upgraded to SerialPort control. SerialPort has been significantly optimized than the previous
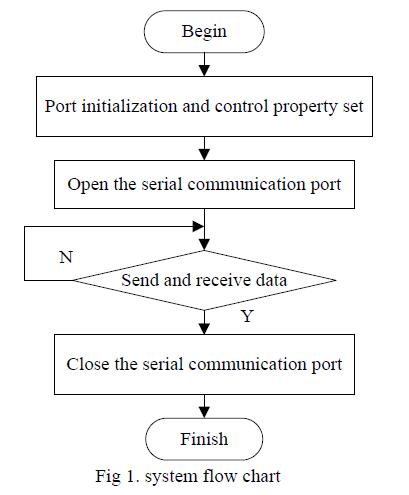
MSCOMM. With this control you can easily achieve serial communication[4]. The system flow chart of serial
communication between Panasonic PLC and PC in C#.NET environment is shown in figure 2.1
3.1 Nameplace
The namespace of SerialPort class is SerialPort.IO.Ports. This new framework can not only access to the serial port on
your computer, but also communicate with serial devices. If you want to use SeriaiPort class, you should add “using
Sytem.IO.Ports;” in the front of the program.
3.2 The parameters of the serial port setting
First, you should get the serial port name of the current computer in the form load and display in comboBox control.
string[] portNames = SerialPort.GetPortNames();
//Get the current computer serial port name array
foreach (string name in portNames)
{
comboBox1.Items.Add(name);
} if (
portNames.Count() != 0)
{
comboBox1.SelectedIndex = 0; // The first serial display in the comboBox
}
After selected serial communication port name in comboBox, set the serial port parameters and open the serial port.
serialPort1.PortName = comboBox1.SelectedItem.ToString(); // Set the port name
serialPort1.BaudRate = 9600; // Set the serial baud rate
serialPort1.Parity = Parity.Odd; // Set parity checking protocol
serialPort1.DataBits = 8; // Set the length of standard data bits of each byte
serialPort1.StopBits = StopBits.One; // Set the number of standard stop bits of each byte
serialPort1.ReadBufferSize = 100; // Set the size of the input buffer
serialPort1.DataReceived += new SerialDataReceivedEventHandler(serialPort1_DataReceived);
// Add data receive events
serialPort1.Open(); // Open the serial port
3.3 Send data
According to Panasonic PLC communication protocol to read the data in the data register DT32712 for example. It’s
instruction code is “%01#RDD3271232713” and the corresponding hexadecimal ASCII is “25 30 31 23 52 44 44 33 32
37 31 32 33 32 37 31 33”. After each ASCII character XOR, the check code is “54”. Data transfer through
serialPort.Write(byte[] buffer,int offset,int count). Part of the send data program is shown below:
string strSend = “%01#RDD3271232713”; // Instruction data to be transmitted
byte t = 0;
byte[] bSend = Encoding.ASCII.GetBytes(strSend);
for (int i = 0; i < strSend.Length; i++) //XOR for instruction data, calculate the check code
{
t ^= bSend [i];
} string strBCC =
t.ToString(“X2”);
string strSend1 = strSend + strBCC + (char)13;
byte[] dytesSend = Encoding.ASCII.GetBytes(strSend1);
serialPort1.Write(dytesSend, 0, dytesSend.Length); // Send instructions
3.4 Receive data
Panasonic PLC receives the command of PC, responses and the result is sent to the relevant response data input buffer,triggering DataReceived events. In the event of an DataReceived,PLC reads input data buffer by serialPort1. Read(byte [] buffer, int offset, int count) function. Read input buffer data and set the while loop, when the number of bytes of the receive buffer at constant exit the loop and then read data. PLC is ready to receive the next buffer data after receive the buffer is empty.
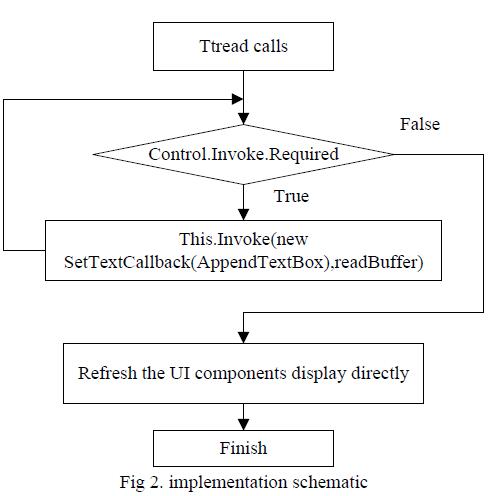
Panasonic PLC sent response results to the data input buffer, triggering DataReceived events. In the DataReceived event we use serialPort1. Read (byte [] buffer, int offset, int count) to read the data in input data buffer. In communication process we need to note that when we directly displayed the processed data which receives from serialPort object in the form of text controls you will find the system throws an exception thread.
That’s because the serialPort DataReceived event is triggered on the auxiliary thread, rather than the main thread which the form controls in. According to MSDN technical manuals, to refresh the displayed data of related components in the form, you must use Invoke to inspire Delegate to access the UI components in the auxiliary thread that DataRecived triggered[5]. It will implement these operations on the appropriate thread and achieve thread-safety calls. Its implementation schematic is shown in Figure 2.2.
Receive data procedures are as follows
:
private void serialPort1_DataReceived(object sender, System.IO.Ports.SerialDataReceivedEventArgs e)
{
int rslength = 0;
bool loop = true; // Judge whether the data of the receive buffer is all received
SerialPortIsReceiving = true; // the bool type of judge whether the serial port is processing data
try
{
Thread.Sleep(30);
while (loop)
{
if (serialPort1.BytesToRead == rslength)
{
loop = false;
}
else
{
rslength = serialPort1.BytesToRead;
// Get the number of bytes of data in the receive buffer
}
Thread.Sleep(30);
}
serialPort1.Read(readBuffer, 0, rslength); // Read the receive buffer data
serialPort1.DiscardInBuffer();//Clear the receive buffer data
rslength = 0;
AppendTextBox(readBuffer);
}
catch { }
finally
{
SerialPortIsReceiving = false;
}
}
delegate void SetTextCallback(byte[] readBuffer);
private void AppendTextBox(byte[] readBuffer)
{
try
{
if (control.InvokeRequired)
//Judge whether the caller thread is the outside of the thread that create control
{
SetTextCallback d = new SetTextCallback(AppendTextBox); // Create a delegate
this.Invoke(d, readBuffer); // Postback change request
}
else
{
string strReceived = Encoding.ASCII.GetString(readBuffer);
}
}
catch { }
}
3.5 Close serial port
C# serial communication involves multi-threading, when other threads are for data processing or UI update, if the simple
forced the closure of the serial interface, software would cause a deadlock. So we set the bool value to estimate whether
the serial port is disposing data or not in the DataReceived event, and when all of the data has been disposed we set the
bool vale to be false. When we get ready for closing the serial port, we need to check if serial port is receiving and
handling the data. And if so we should wait for it until the data is over. Close serial port procedures are as follows:
serialPort1.DataReceived -= serialPort1_DataReceived;
while (SerialPortIsReceiving) // Check whether data is being transmitted
{
Application.DoEvents();
}
serialPort1.Close(); //Close serial port
4. CONCLUSION
In this paper the author described the communication between Panasonic PLC and PC through the analysis of the
Panasonic PLC communication protocol and the argument of data transmission process of SerialPort controls. In this
method designed a good application software platform to control Renishaw XL-80 interferometer and Panasonic
FPGC32TH model PLC in the laser tracker calibration device. By that the correctness and reliability of communication
design method proposed in this paper have been verified.
Our Company supply spare parts for Industrial Automation worldwide.
Always at the best price, Always in the shortest time.
In case you are looking for any hard to find or obsolete electronic components, feel free to contact me.
I will process all your requirements immediately.
Our Top selling Products/Models as below:
6es7141-6bh00-0ab0
6ES7155-5AA00-0AB0
6ES7193-6BP00-0BA0
6es7-321-1bl00-0aa0
6es7214-1ag40-0xb0
6es7331-7kf02-0ab0
6av6643-0cd01-1ax1
6es7331-1kf02-0ab0
dp-101
1747-asb
6av2124-0gc01-0ax0
6av2124-0mc01-0ax0
fs450r12ke3
1769-l32e
6ed1052-1fb00-0ba8
6ep1333-2ba20
6es7153-2ba10-0xb0
6es7216-2bd23-0xb0
6es7-321-1bl00-0aa0
cpm1a
cqm1